
Using the Fuji F30 Underwater
or more appropriately, how to get better results from the Fuji F30 when it's in its waterproof plastic box.
Intro
Before delving into the how's etc a quick overview of the F30 is called for.
A few years ago, Fuji created the F30 which became the Tesco Value holy grail of underwater cameras. It boasted a 6Mp sensor, which produced bright,
vibrant, relatively noise free images. It also allowed it's owner to shoot video in VGA resolution (640x480) at 30 fps. This last feature was my reason
for buying one as the video on my Olympus 5060 was only a jerky 15 fps (frames per second)
After my first use of the F30 I quickly came to recognise its strengths as a stills camera - it was faster focusing than the 5060, its noise performance
was lots better than the 5060 and its low light performance was better than the 5060. On the down side, compared to the 5060, it doesn't u se cards
larger than 2Gb, doesn't shoot in RAW, doesn't allow flash exposure compensation and doesn't have full manual exposure control. This last one was a
bit of a sticking point but is something that the diver can work around (to a certain degree) with a bit of nous.
Shooting Modes
The F30 has various shooting modes selected using the top dial.
Firstly, we have the shaky man mode. This will simply increase the ISO level (and consequently noise) so that the camera can use a faster shutter speed
to try to eliminate camera shake (there is no vibration reduction hardware included in the F30).
Next, we have the N/SP mode. This allows you to set various scenes / shooting modes. A bit more useful than the shaky man mode, but still the camera
decides on the settings to use and may choose a higher ISO value.
Pause. Rewind. What's so special about ISO?
ISO is the 'sensitivity' of the sensor. The sensor built into the camera will only have 1 sensitivity without physically removing it and replacing it
with another sensor (e.g. swapping a roll of film). However as it is electronic, the signals coming from the sensor can be amplified, in theory improving
the apparent sensitivity of the imaging chip. Make sense? However, there is a trade off. Amplifying stuff will amplify any inconsistencies and will
also introduce noise - think of those nice grainy green images you see on TV from night vision goggles...that's noise. So, to keep our images as crisp
as possible we should ALWAYS seek to use the lowest ISO number that the camera has available.
After N/SP, we find the red camera mode. This is what I term muppet mode where the camera will decide absolutely everything for you. It will get you
a photo but it could be at the expense of a high ISO setting and consequently a pretty noisy image. The only time my camera ever hits this particular
setting is when the thing is loaded into and removed from the housing.
Following on from muppet mode, we have manual mode, The manual side of it lets you decide the ISO, the metering mode, the white balance, the focus mode
and a few other things beside. The camera is left to decide the shutter speed and the aperture value, so it's not a true manual mode, but is by far
the best mode we've seen so far.
Finally, and ignoring the video mode, we come to the only mode you should ever need when shooting under the water. The A/S mode.
This mode allows you to either operate the camera in aperture priority mode or shutter priority mode. Which you use and when depends on the circumstances.
Ideally, you should have an understanding of apertures to appreciate what the different settings mean to your photos. Luckily, the F30 manual
gives a sufficient explanation on page 52.
Unfortunately, Fuji decided that we can only influence either the shutter speed or the aperture with the other one being taken care of by the camera.
Within this mode we also have full access to the rest of the functions as described in manual mode above. So, we can decide the ISO, decide the metering,
the focus mode etc etc.
A/S Mode
The inclusion of the A/S mode on the F30 is what makes this camera so desirable. For the later F40 and the F50, Fuji elected to remove this mode. It
has since been re-introduced with the F60 (August 2008) but is missing from the F100 (Jan 2008). Further details of these range of cameras can be found
on wikipedia.
Generally, I'll run the camera in aperture priority mode. This is set by hitting MENU, SHOOTING MODE and selecting A APERTURE PRIORITY. You'll see that
on this menu you can also select shutter priority.
At the moment we're only half way there as we still need to set either the aperture or the shutter speed. This is accomplished by pressing the little
± (exposure compensation) button on the bottom right corner of the rear of the camera.
On selecting this button you can use the up & down arrows to influence the exposure or you can use the left and right arrows to dial in your desired
aperture or shutter speed value. One neat thing here is that you don't need to press the ± a second time to register the setting. This
means that you can leave the camera with this sub menu showing to quickly swap between settings. To exit this sub menu, press the ± button a
2nd time.
I'll swap to shutter priority mode when I want to force the camera to underexpose the background. Typically in low light conditions, the camera will
have already selected the widest aperture setting, so you can influence the level of underexposure by selecting a faster shutter speed (see example
later)
My Settings
Below are the settings that are most commonly used when I take the F30 diving....
-- f menu --
· ISO - 100
· Quality - always at 6F (6 huge pixies, fine). With a 2Gb card, this will give you around 750 photos - more than enough for a couple of dives
· FinePix color - STD (standard)
-- normal menu --
· Shooting mode - A or S
· Photometry - Multi (spot also used occasionally)
· White Balance - Auto
· High Speed Shooting - OFF
· Continuous - OFF
· AF mode - centre
-- set-up sub menu --
· Image disp - 1.5 sec
· Frame No - continuous
· AF illuminator - ON
· Digital Zoom - OFF
· LCD mode - PS (powersave)
· Long Exposure - OFF
· Auto power off - 2 mins
Explanation of the above
My settings are geared towards getting the best performance from the sensor and getting the best performance from the battery.
So....
The set-up sub menu stuff is aimed to maximise battery performance. Typically I'd expect to be able to use the camera on 3 dives lasting 60mins+ each
before needing to open the casing. When the casing has been opened, the card will be swapped for a fresh one and the images transferred to an image
tank. The battery will also be swapped for a fresh one.
ISO 100 is used to minimise sensor noise.
6F is used so that the least amount of file compression is used, helping to reduce JPEG artifacts.
There is a 3:2 mode which will record more pixels (3024 x 2016 verses 2848 x 2136), however the 3:2 mode will only use normal compression so is therefore
discounted.
finepix color is generally ignored as any colour post processing can be done later. There would be nothing worse than shooting in B&W only to find
you want the colour image. If you do feel you want to improve the saturation of the colours, select Chrome
Photometry is set to multi to get a balanced exposure for the scene. I'll use spot mode if I have an isolated subject (jellyfish in mid water) with
which I don't care about getting the background exposed correctly
White balance is set to AUTO as I usually use flash. Using flash will set the WB to 5600°K unless you've set custom white balance set in which case
that particular setting will be used and the pictures will take on a blue or orange tint depending on how you've set the balance.
I tend not to use custom WB as if you forget it's switched on, your flash shots can get ruined. Any WB adjustments are done in post processing using
something like Lightroom
High speed shooting supposedly makes the camera focus faster. It also uses more power from the battery so is therefore not used.
Continuous is set to OFF as it will disable the flash. Great if you're shooting sharks or something from a distance, but the rate isn't quick so doesn't
get used that much.
AF mode is set to centre as I prefer to point the camera at the subject I want in focus rather than it decide on the most likely target. The half press
of the shutter (takes some practice with the camera in the housing) will allow you to re-compose the framing to what you want.
Flash Photography
The F30 is blessed with a flash that will be sufficient for subjects up to 1m (3 ft) away and the Fuji housing also has a very useful flash extender
included with it. You will require the flash extender when taking close up macro shots so that the lens port doesn't cast an ugly shadow. I've used
the built in flash to get very good macro results, however the proximity to the lens means that particles within the water will always pose a problem,
showing up as white specs on your photos.
A better alternative is to use a 3rd party strobe. Personally, I use Sea & Sea YS-60 TTL./S strobes (a throwback from my old film camera setups)
coupled to Matthias Heinrich produced digital adaptors. There are alternative combinations such as Inon strobes etc, but having never tried these I
can't comment on their usage.
Batteries
As mentioned a little earlier, the battery performance on the F30 is very good and will easily last for 2 dives lasting an hour or more each. What isn't
so good is the charging performance as the camera is needed to charge the battery.
Therefore for stuff like liveaboard trips you will require 2 batteries per day, with your charging being done in shifts during the evening / overnight.
This does mean that you'll probably be left setting the camera up in the housing first thing in the morning. Not ideal if you've got a hammerhead hunt
dive at 5am.
The alternative is to purchase an external battery charger. The one I use is a Zental charger (£10 ebay job iirc) which will charge the NP-95
battery in 1-2 hrs. Spare batteries can be gotten from 7-day
shop for around £3.50. So for the price of 3 or 4 pints of falling down water you can get a hassle free charging solution.
Tips & Tricks
Motion blurred images....
Motion blur comes from 2 sources - either the subject is moving too quickly or the photographer can't hold the camera steady enough.
Subject Moving too Quickly
If the subject is getting motion blurred then you will need to use a faster shutter speed. A faster shutter speed may mean a less exposed picture if
the camera is already using the widest possible aperture setting. There are several controls available to force the use of a faster shutter speed:
· Use shutter priority in A/S mode and physically select a faster shutter speed
· Use the exposure compensation tool (±)and tell the camera to underexpose by 1 stop. This will double the shutter speed. You will probably
need to brighten the image later though.
· Increase the ISO sensitivity. As the ISO doubles, so does the shutter speed.
The above is assuming you're not using flash but shooting using ambient light only.
Camera shake
Underwater you can get away with slower shutter speeds as the water itself helps to dampen any movement. If you find that your pics are still suffering
with camera shake, get closer to your subject and zoom out. Fully zoomed out with the F30, you can get away with shutter speeds as low as 1/15th second.
If your shutter speeds are lower than this, or you can't get a stable shot with a speed this slow then you'll either need to brace the camera against
something (wreckage, rocks etc), use a tripod / monopod (!), use a faster shutter speed or use flash
Macro Mode
The F30 has a great 5cm minimum focusing distance when the lens is fully zoomed out. When zoomed in, the minimum focus distance increases to 30cm. When
applied to taking pictures, the result is that you can get a 'bigger' macro shot by zooming out and getting as close as you can - try it on land first
to see where the limits are. So for static, none skittish subjects, working with the minimum zoom is the way to go. For more shy subjects, start off
zoomed fully in and reduce the zoom as you work your way closer.
If flash is required, you will either need an external strobe or will need to use the flash extender supplied with the Fuji housing.
Getting Deep Blue Backgrounds
We've all seen those shots with a lovely deep azure background with a nice bright subject right?
These are achieved by using flash (no real surprise there) and by intentionally underexposing the background.
To do that, ordinarily, you need full manual control over the camera so that you can find your exposure for the background, then dial in settings that
will underexpose it by 2-3 stops. It is possible to 'fool' the F30 into doing something similar.
You need to be in A/S mode with you controlling the shutter speed. We start by first turning off the flash and then telling the camera to underexpose
by one stop (that's setting the ± control to -1).Using the flash disables exposure compensation so why do we bother setting it?
Simply, we use it to get a base reading for the background and give us a starting point for the settings we require...
With the camera set to -1, make sure that the adjust shutter speed mode is active. Point the camera at the blue water background and adjust the shutter
speed until the aperture setting just changes to red. We now have the shutter speed that is needed to underexpose the background by 1 stop.
You can now exit ± mode and turn the flash back on. Compose your photo and take the shot. If the background isn't dark enough, go back into the
shutter speed adjust mode and increase the shutter speed. Doubling it will underexpose by a further stop.
What we are doing is using the minimum aperture setting and deliberately taking the camera beyond what it thinks is the correct shutter speed for that
aperture. As the camera cannot open the aperture beyond F2.8 (or F5 if you're fully zoomed in) we have some control over the exposure. This does mean
that as the aperture is 'wide open' we have a reduced depth of field to play with. In reality, this makes little difference as the DoF is greater with
compact cameras than say with a dSLR.
Enough of that, below are 3 pics taken showing the above technique in use. The ISO, zoom, aperture and shutter details have been overlaid on the photos.
Other than the overlay, each photo is as taken by the camera.

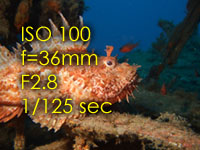

You should notice that the subject is lit identically in each photo, but the background gets progressively darker. The first shot has already underexposed
the background by 1 stop. The 2nd has further underexposed by another 2/3rd of a stop. The 3rd photo, although taken slightly closer, has underexposed
the background by yet another 2/3rd of a stop.
We can see that this technique, albeit a bit fiddly, can yield decent results that belie the fact that the image came from a relatively simple camera.
Zoom Range
The F30 is 'blessed' with an equivalent zoom range of 36mm to 108mm, so wide angle underwater is a bit of a problem. There are however, solutions.
You can go for the Inon lenses (relatively expensive, but the best currently available, especially for ultra wide), the April '09 announced Fantasea
20mm equivalent offering, or if you've got a Sea & Sea wide angle lens laying about somewhere, then this
article may be of interest.
| v1.1 | 31st May 2009 | Wide angle notes added |
| v1 | 26th Oct 2008 | Page created |